Friday, December 31, 2010

Train Table

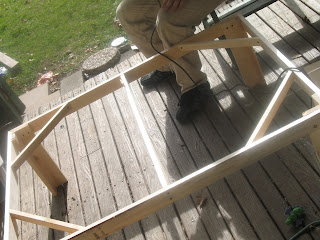
This table still isn't 100% finished but I'm tired of waiting on last minute details so I'm just going to go ahead and post it. I've seen quite a few plans on how to build one and they all look pretty simple. The basic idea is plywood top, 1x4 trim and 1x3's and 1x4's for the legs. DH built the structure and kind of played it by ear while he was doing it lol. We wanted it to be super sturdy so it will last a long time and assuming it's going to be climbed on at some point in it's life.

We were going to put a hole in the middle and go all out, but we decided that would end up being too big of a table so scratch that idea. I have since seen some with holes in the middle that look pretty awesome though. I drew inspiration from these. I really like the way this one looks so I pretty much copied her top. I did use the outdoor carpet for grass which was taller so the resin didn't completely cover it. I still need to ad more in the future, but for now, it works good as is. And this one was pretty freakin' awesome! I absolutely love the personalization of the hand prints so I stole that idea as well. Like I've said before, I'm a sentimental fool lol.

So here's a few shots in the making...


I also had big plans to make the sides solid and paint them to look like a tunnel with bricks etc etc etc.... but i stuck with solid white... meh... I never have time to do things the way I REALLY want to do them. I'm waiting for the day when the kids are old enough to fend for themselves so I can lock myself in my craft room and never come out hahaha.


The leftover table scraps became the thread rack for DH's mom. Thrifty eh? ;p


Here it is before the resin. For the road, I used the black decor sand, poured Elmer's glue and sprinkled it over so it looks like gravel. The water and beach I am not particularly happy with. I should have put more sand cuz you can see the blue paint under it in some spots. I used regular sand for that part with the glue. Same idea. A ship from the scrap-booking department. The dirt road was actually a "patch job". I couldn't get a piece of the grass carpet to fit the whole area so I tried to patch it together with a "seem" but it looked tacky so insert a dirt road. It was all I could think of last minute. I was running behind, working on it when Z was napping. I wanted it to be a surprise on Christmas morning, but he managed to sneak in there a few times and saw it lol. 


And my FAVORITE part!!  


... ps: getting a 2yr old and a 5mo old's handprints is not as easy as it looks lol. I had to do quite a few times of trying and wiping it off before I got a solid print. Thank God for Mod Podge! And in case you havn't figure out yet, the Z&A Railroad stands for Zander and Avalon. Duh. I loves it ;p


Lastly, I bought some of these wooden crates from Joann's for $5 each with coupons, painted them white, and decorated some letters for the front. His and hers toy storage. I still intend to get 2 more. I can fit 4 under there perfectly. New rule: if it doesn't fit under the train table, it goes in storage. I also have little wheels to attatch on the bottom so they roll easy but don't have the right size screws so that part is on hold too. 


More Mod Podging. I seriously love this stuff.


The reveal...


He literally did not walk away from this table for two days straight. He wakes up in his sleep saying "choo choo train" and goes back to sleep lol. I am so not even kidding. He's the darn cutest kid in the planet! I love making him smile :)


Monday, December 27, 2010

Car Cozy

Now that Christmas is over, the train table finished, thread holder done, baby legs made, I was done with everything I had been working on. I can NOT wait to get started on the quiet book but don't have the supplies yet. I'm not brave enough to go shopping right after the holidays. I have no desire to be standing in line for hours to buy 3 yards of muslin with a screaming baby. So I decided to scrap together something with what I had on hand last night. (I'm in the crafting groove lol) I actually started out to make a crayon holder similiar, but changed my mind.

I was soooo ready to murder my sewing machine! A simple project took way longer than it should have. My thread kept wadding up on me and then my needle broke. I went through 3 needles. Apparently, the iron on bond stuff that I use when doing fabric appliqués gets the needle sticky and causes a lot of problems. Now I have to figure out another way of doing things because this is the third time I've had issues with it.

..So on to the car cozy. These are so cool! Zander agrees. He's been playing with it all night and all morning. And he now knows which one is the number "4". He's so shmart ;p


I used an old pair of jeans, some scrap fabric, and a magnetic snap from an old bag. The numbers are wax paper stenciled. I've done stenciling with printing on cardstock but I just learned it can be done with wax paper. The wax paper temporarily adheres to the fabric when you run the iron over it. Nifty. 

My sewing is not perfect. Like I said, I went through 3 needles lol. By this point, I was really just wanting to get it over with.


I did a variation of these: Jill's was my fave. I used her number template as well. Here's a car and crayon caddy that I found very creative. And My Little Gems has a great tutorial.


Sunday, December 19, 2010

Thread Rack Project

I inherited this thread rack from my late grandmother. Funny story actually... I had went to visit her and I think it was the last time I saw her before she passed away that she was aware and able to communicate. I mentioned that her thread rack was cute so she insisted I have it. It was almost like she knew she wouldn't see me again. We used to live down the road from her and spent our childhood riding our bikes up and down the road to visit. She had a big hand in my home-making skills. She used to have me help her make lap quilts for the elderly and shut-ins. She was the poster image grandmother in every way. I took the thread rack and noticed hanging on the bottom was a pin cushion I had made for her a loooooong time ago lol. I couldn't have been more than ten. I even embroidered a "G" for Grandma, haha. That brought back memories for sure.


My mother in law saw it and liked it so I thought it would be a fun project to make her a similar one. I have actually had most of the materials for over a year and have just now got around to it! I used the old one as a template to trace onto some scraps from our train table (post coming) and the paint from my bow holder project. I LOVE this color! It's called "Beach Toy" and I think it's Kiltz. Great color. For the initials, I Google searched monogram images and printed out a stencil. The butterflies are rub-on decals and I freehanded some scroll lines to tie it all together. 

Now I have to figure out how to wrap it up for Christmas...  Oh and my two yr old thought he would try walking on it so two of the little prongs are broke off. oops...


Friday, December 10, 2010

Easy Peasy Baby Leg Tutorial

These are my first attempt at the DIY Baby Legs. Everyone keeps telling me they are super easy and they were NOT kidding! So simple and quick! I bought the knee socks at Target in the women's section for $1.99 I believe and both pictured are the same size. I love that they fit my 5mo old AND my 2 1/2yr old. When my first was a baby he was super chunky and the baby legs I had only fit him for a very short while before his little thunder thighs outgrew them.

...And just look how darn cute these are...


I love this pic ;p 


Now I know there are a ton of tutorials out there so I wasn't going to ad one here for that reason, but then I figured I may as well while I'm at it so...

1) Buy some knee socks and cut them like so... 
(The heel and toe are not needed. I'm saving mine to use for stuffing toys or whatever else I come up with) 


2) Take the piece you cut from the foot, open it up, and fold it wrong sides together cut ends matching...


3) Place this over the end of the leg piece right sides together and cut ends matching...


4) Open it up and sew around the edge. (You should have 3 layers to sew together)


5) Flip the end piece over and Voila! 


Now how easy was that?! I think it took me longer to make this blog post than it did to make the leggings lol.


Picture Frame Bow Holder

I was searching for ideas to make my little angel a bow holder for all her new bows and came across these re-purposed old frames. Brilliant and adorable all in one. I totally snatched someone else's idea, but hey it's what I'm good at lol.

Let me ad I am so disappointed in our re-sale shops! I went looking for a cheapy frame to re-purpose thinking I could score one for just a few bucks and they wanted 20-30 or more at Salvation Army! Ridiculous.


Monday, December 6, 2010

Headbands... Take One

I have been wanting to make some of the little flowery headbands for my little princess. Once I started, I was hooked lol. I had way too much fun with them. Can't wait to do some more, but for now, there simply aren't enough hours in the day. My to do list is overloaded for the time being.


Hehe.. He did not like being my model. Unfortunately, because he has a darn cute head ;)  ...And I think I may steal this one for myself. It's my fave.


Turkey Day Outfits

These were super fun, but we had to ditch the tutu as it was a little much for a four month old. I wanted to make them matching outfits but there is not much out there in the way of crafts for boys so I did the little tie appliqué shirts. The stupid craft store was out of fall fabric but luckily I found this great argyle print and had some matching striped fabric in my scrap collection. I love my boy to death, but I am so glad to have a little girl to make all these fun girly things for :)


Gobbleicious! Now is that cute or what? DH asked me if I spelled that right.. um... pretty sure it's close enough lol. 


And my absolutely stunning models :)